
'%3e%3cpath%20d='M9%2021H15'%20stroke='black'%20stroke-width='2'%20stroke-linecap='round'%20stroke-linejoin='round'/%3e%3cpath%20d='M5.25001%209.75C5.25001%207.95979%205.96116%206.2429%207.22703%204.97703C8.4929%203.71116%2010.2098%203%2012%203C13.7902%203%2015.5071%203.71116%2016.773%204.97703C18.0388%206.2429%2018.75%207.95979%2018.75%209.75C18.75%2013.1081%2019.5281%2015.8063%2020.1469%2016.875C20.2126%2016.9888%2020.2472%2017.1179%2020.2474%2017.2493C20.2475%2017.3808%2020.2131%2017.5099%2020.1475%2017.6239C20.082%2017.7378%2019.9877%2017.8325%2019.8741%2017.8985C19.7604%2017.9645%2019.6314%2017.9995%2019.5%2018H4.50001C4.36874%2017.9992%204.23997%2017.964%204.12659%2017.8978C4.0132%2017.8317%203.91916%2017.7369%203.85387%2017.6231C3.78858%2017.5092%203.75432%2017.3801%203.75452%2017.2489C3.75472%2017.1176%203.78937%2016.9887%203.85501%2016.875C4.47282%2015.8063%205.25001%2013.1072%205.25001%209.75Z'%20stroke='black'%20stroke-width='2'%20stroke-linecap='round'%20stroke-linejoin='round'/%3e%3c/g%3e%3cdefs%3e%3cclipPath%20id='clip0_4762_133'%3e%3crect%20width='24'%20height='24'%20fill='white'/%3e%3c/clipPath%3e%3c/defs%3e%3c/svg%3e)
'%3e%3cpath%20d='M24%200H0V24H24V0Z'%20fill='white'%20fill-opacity='0.01'/%3e%3cpath%20d='M12%2011C14.2091%2011%2016%209.20914%2016%207C16%204.79086%2014.2091%203%2012%203C9.79086%203%208%204.79086%208%207C8%209.20914%209.79086%2011%2012%2011Z'%20stroke='black'%20stroke-width='2'%20stroke-linecap='round'%20stroke-linejoin='round'/%3e%3cpath%20d='M4%2021V20.4857C4%2018.5655%204%2017.6055%204.38753%2016.872C4.72841%2016.2269%205.27235%2015.7024%205.94138%2015.3737C6.70196%2015%207.6976%2015%209.68889%2015H14.3111C16.3024%2015%2017.298%2015%2018.0586%2015.3737C18.7276%2015.7024%2019.2716%2016.2269%2019.6125%2016.872C20%2017.6055%2020%2018.5655%2020%2020.4857V21'%20stroke='black'%20stroke-width='2'%20stroke-linecap='round'%20stroke-linejoin='round'/%3e%3c/g%3e%3cdefs%3e%3cclipPath%20id='clip0_4762_139'%3e%3crect%20width='24'%20height='24'%20fill='white'/%3e%3c/clipPath%3e%3c/defs%3e%3c/svg%3e)

懒猫微服启动脚本让重启丢失的配置自动恢复
liu
懒猫微服启动脚本管理框架:5分钟搞定系统配置持久化
一个专为懒猫微服平台设计的启动脚本管理框架,让你的系统配置在重启后自动恢复
项目地址:https://github.com/lazycatapps/user-startup.d
🎯 引子:你是否也遇到这些困扰?
你是否曾经遇到过这样的场景:
- 💔 精心配置的系统参数,重启后全部消失
- 😫 辛苦安装的开发工具,第二天登录时又要重新安装
- 🤔 每次重启都要手动执行一堆命令,重复劳动令人崩溃
如果你正在使用 懒猫微服平台,这些都不是你的错!这是平台的特殊设计——系统重启后会自动还原所有修改。
但是,有没有办法让这些配置自动恢复呢?
答案是:有! 而且只需要 5 分钟就能搞定。
📖 目录
一、背景:为什么需要这个工具
1.1 懒猫平台的"重启还原"特性
懒猫微服平台采用了一个独特的系统设计:重启后会自动还原所有系统修改。
这意味着:
- 通过
apt install安装的软件会在重启后消失 - 对系统配置文件的修改会被还原到初始状态
- 精心设置的环境变量无法持久化保存
为什么要这样设计? 根据 官方 FAQ:
- 系统状态可预测 - 避免累积的系统修改导致系统处于无法预料的状态
- 风险管理 - 防止系统更新破坏已有配置
- 平台安全性 - 防止恶意软件持久化驻留
1.2 官方方案 vs 本项目
懒猫官方提供了两种解决方案(详见 官方文档):
| 特性 | user-startup.d (Hook) | Systemd 用户服务 | Docker 容器 |
|---|---|---|---|
| 配置复杂度 | ⭐ 简单 | ⭐⭐ 中等 | ⭐⭐⭐ 复杂 |
| 学习成本 | Shell 脚本基础即可 | 需了解 systemd | 需了解 Docker |
| 日志管理 | ✅ 统一集中 | ❌ 需手动配置 | ❌ 需手动配置 |
| 脚本组织 | ✅ 目录结构清晰 | ❌ 分散的 service 文件 | ❌ 混在 compose 文件中 |
1.3 本项目的核心优势
✅ 降低配置门槛 - 直接使用熟悉的 Shell 脚本,无需学习 systemd 或 Docker
✅ 统一日志管理 - 所有日志集中存放在 /tmp/user-startup-hooks/
✅ 灵活控制执行顺序 - 使用数字前缀控制脚本执行顺序,支持同步/异步模式
✅ 不阻塞系统启动 - 使用 nohup 后台执行,Hook 入口脚本快速退出
✅ 开箱即用 - 提供脚本模板和 Makefile 工具,一键安装/卸载
二、认识:这是个什么样的解决方案
2.1 核心架构
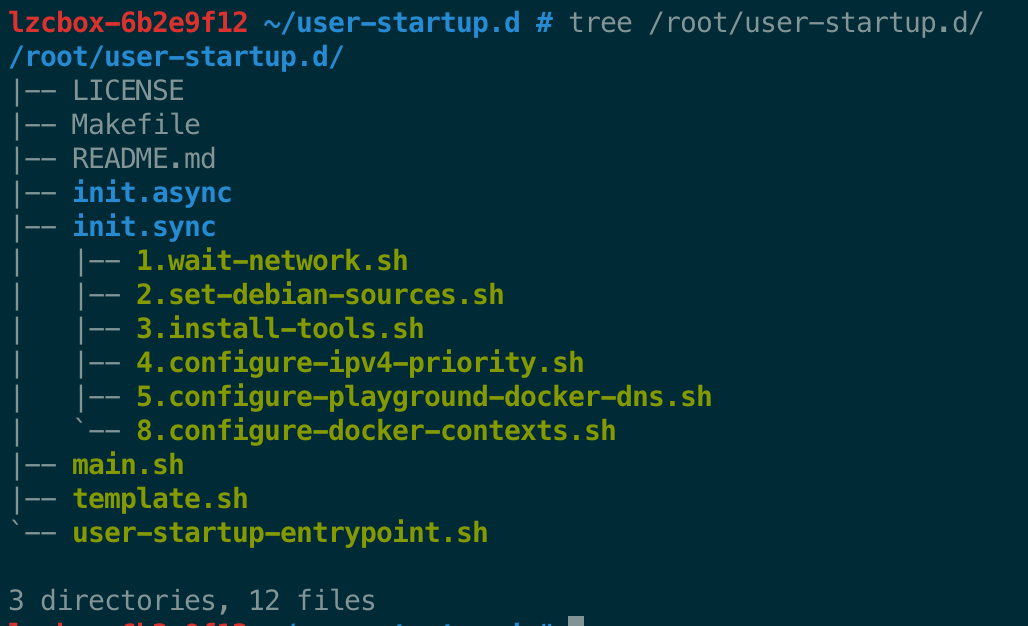
user-startup.d/
├── Makefile                    # 一键安装/卸载工具
├── template.sh                 # 脚本模板
├── user-startup-entrypoint.sh  # Hook 入口(快速派发)
├── main.sh                     # 主调度器(后台执行)
├── init.async/                 # 异步脚本目录(并行执行)
│   └── *.sh
└── init.sync/                  # 同步脚本目录(顺序执行)
    ├── 1.wait-network.sh
    ├── 2.set-debian-sources.sh
    ├── 3.install-tools.sh
    └── ...
2.2 执行流程
系统启动 → 用户解锁数据盘 → data-disk-ready Hook 触发
    ↓
user-startup-entrypoint.sh (快速派发)
    ↓ nohup 后台
main.sh
    ├─ 阶段1: init.async/*.sh (并行执行)
    └─ 阶段2: init.sync/*.sh (顺序执行)
关键特性:
- Wrapper 脚本机制 - 使用 wrapper 而非符号链接,避免 SELinux/AppArmor 安全策略限制
- 智能日志系统 - 日志目录结构与源码一致:
/tmp/user-startup-hooks/ - 非阻塞式执行 - Hook 入口在 1 秒内退出,耗时任务后台执行
2.3 async vs sync 的选择
| 类型 | init.async/ | init.sync/ |
|---|---|---|
| 执行方式 | 后台并行,使用 nohup | 顺序执行,等待前一个完成 |
| 适用场景 | 耗时且不阻塞的任务 | 有依赖关系的任务 |
| 典型示例 | NFS挂载、DDNS更新、日志上传 | 网络等待、软件安装、配置文件修改 |
三、场景:什么时候使用
3.1 Hook 触发时机
系统启动 → 提示输入硬盘密码 → 用户解锁 → 数据盘就绪 → 触发 hook
此时的系统状态:
| 状态 | 是否就绪 | 说明 |
|---|---|---|
| 数据盘 | ✅ 已挂载 | 可以安全访问 /data 等用户目录 |
| 网络 | ⚠️ 可能未就绪 | 需要主动等待(参考 1.wait-network.sh) |
| Docker | ⚠️ 可能未启动 | 如需使用 Docker 需检查服务状态 |
3.2 典型应用场景
- 系统配置持久化 - 自动配置软件源、网络参数、IPv4 优先级等
- 自动安装开发工具 - 重启后自动安装 vim、curl、htop 等工具
- 挂载网络存储 - 自动挂载 NFS、CIFS 共享目录
- 配置 Docker 环境 - 自动创建 docker contexts、配置 DNS 解析器
- 服务自动启动 - 启动监控服务、DDNS 更新等
四、快速开始
4.1 安装项目(1 分钟)
# 1. 克隆项目到懒猫微服推荐位置
cd /root
# 你也可以 Fork 到自己的组织下后,将 <lazycatapps> 替换为你自己的组织名
git clone https://github.com/lazycatapps/user-startup.d.git
cd user-startup.d

# 2. 安装系统 hook
make install

# 3. 验证安装状态
make status
预期输出:
Wrapper script is installed:
-rwxr-xr-x 1 root root 153 Jan 11 12:52 /lzcsys/var/custom/hooks/data-disk-ready/user-startup-entrypoint.sh

Content:
#!/bin/bash
# Auto-generated wrapper script
# This script calls the actual entrypoint script
exec "/root/user-startup.d/user-startup-entrypoint.sh" "$@"
4.2 创建第一个脚本(2 分钟)
# 1. 从模板创建新脚本
cp template.sh init.sync/6.hello-world.sh

# 2. 添加执行权限
chmod +x init.sync/6.hello-world.sh

# 3. 编辑脚本
vim init.sync/6.hello-world.sh
编辑内容(在"主要逻辑"部分添加):
# ============================================
# 主要逻辑
# ============================================
log "============================================"
log "Starting task: ${SCRIPT_NAME}"

log "Hello, Lazycat User!"
log "Current time: $(date)"
log "Current user: $(whoami)"
log "Hostname: $(hostname)"

log "Task completed successfully"
log "============================================"
4.3 测试脚本(2 分钟)
# 方法1: 单独测试脚本
./init.sync/6.hello-world.sh

# 方法2: 测试完整流程(推荐)
./main.sh

# 查看执行日志
cat /tmp/user-startup-hooks/init.sync/6.hello-world.log
预期输出:
2026-01-11 12:00:00 - ============================================
2026-01-11 12:00:00 - Starting task: 6.hello-world
2026-01-11 12:00:00 - Hello, Lazycat User!
2026-01-11 12:00:00 - Current time: Sat Jan 11 12:00:00 CST 2026
2026-01-11 12:00:00 - Current user: root
2026-01-11 12:00:00 - Hostname: lazycat-server
2026-01-11 12:00:00 - Task completed successfully
2026-01-11 12:00:00 - ============================================
4.4 系统重启后自动执行
# 重启系统
sudo reboot

# 重启后,查看执行结果
cat /tmp/user-startup-hooks/main.log
cat /tmp/user-startup-hooks/init.sync/6.hello-world.log
🎉 恭喜!你已经成功创建并运行了第一个启动脚本!
4.5 脚本开发要点
使用标准模板
始终从 template.sh 复制,保持一致的结构:
#!/bin/bash

# 脚本说明

# 日志配置(标准配置,所有脚本保持一致)
SCRIPT_NAME="$(basename "$0" .sh)"
SCRIPT_DIR_NAME="$(basename "$(dirname "$0")")"
LOG_DIR="/tmp/user-startup-hooks/${SCRIPT_DIR_NAME}"
LOG_FILE="${LOG_DIR}/${SCRIPT_NAME}.log"

mkdir -p "$LOG_DIR"

log() {
    echo "$(date '+%Y-%m-%d %H:%M:%S') - $1" | tee -a "$LOG_FILE"
}

# 脚本配置区域
# CONFIG_VAR="value"

# 主要逻辑
log "============================================"
log "Starting task: ${SCRIPT_NAME}"

# 你的代码...

log "Task completed successfully"
log "============================================"
实现幂等性
确保脚本多次执行结果一致:
# ❌ 错误示例(非幂等)
echo "export PATH=/opt/bin:\$PATH" >> ~/.bashrc

# ✅ 正确示例(幂等)
if ! grep -q "export PATH=/opt/bin" ~/.bashrc; then
    echo "export PATH=/opt/bin:\$PATH" >> ~/.bashrc
    log "Added /opt/bin to PATH"
else
    log "PATH already configured, skipping"
fi
处理网络依赖
需要网络的操作应先等待网络:
# 检查网络连接
log "Checking network connectivity..."
for i in {1..12}; do
    if ping -c 1 -W 2 8.8.8.8 >/dev/null 2>&1; then
        log "Network is ready"
        break
    fi
    log "Waiting for network... (attempt $i/12)"
    sleep 5
done

if ! ping -c 1 -W 2 8.8.8.8 >/dev/null 2>&1; then
    log "ERROR: Network timeout after 60 seconds"
    exit 1
fi
4.6 常用命令
# Makefile 命令
make help      # 显示帮助信息
make install   # 安装系统 hook
make uninstall # 卸载系统 hook
make status    # 检查安装状态

# 手动执行
./main.sh                                    # 测试完整流程
./init.sync/1.wait-network.sh                # 执行单个脚本

# 查看日志
cat /tmp/user-startup-hooks/main.log         # 查看主日志
tail -f /tmp/user-startup-hooks/init.sync/1.wait-network.log  # 实时监控

# 调试
bash -x ./init.sync/6.my-task.sh             # 启用调试模式

# 禁用脚本
chmod -x init.sync/3.install-tools.sh        # 移除执行权限
mv init.sync/3.install-tools.sh{,.disabled}  # 重命名文件
五、重要注意事项
5.1 严重风险(必须避免)
⚠️ Hook 脚本长时间运行
- ❌ 问题:
user-startup-entrypoint.sh中直接执行耗时任务 - ✅ 解决:使用
nohup将任务派发到后台(框架已实现) - 💥 后果:严重延迟系统启动,可能导致超时
⚠️ 脚本没有幂等性
- ❌ 问题:重复执行导致配置错误(如重复追加到文件)
- ✅ 解决:添加检查逻辑,避免重复操作
- 💥 后果:配置文件混乱,系统行为异常
⚠️ 未处理网络依赖
- ❌ 问题:直接执行需要网络的操作(如
apt-get update) - ✅ 解决:先等待网络就绪(参考
1.wait-network.sh) - 💥 后果:命令执行失败,启动流程中断
5.2 常见陷阱
1. 日志路径使用 /tmp
- ⚠️ 影响:系统重启后日志自动清空
- 💡 建议:如需持久化日志,改为
/data/logs/路径
2. 脚本执行顺序混乱
- ⚠️ 影响:依赖关系错乱导致任务失败
- 💡 建议:仔细规划编号,确保依赖项先执行
3. 错误未记录日志
- ⚠️ 影响:排查问题困难
- 💡 建议:关键步骤都记录日志,错误时记录详细信息
4. 忘记测试脚本
- ⚠️ 影响:系统重启后才发现问题
- 💡 建议:先手动测试
./script.sh和./main.sh
5.3 最佳实践清单
开发阶段 ✅
- 从
template.sh复制创建新脚本 - 使用描述性的文件名(数字 + 说明)
- 实现幂等性检查
- 添加详细的日志记录
- 处理错误情况(检查退出码)
- 网络依赖任务先等待网络
测试阶段 ✅
- 单独测试脚本:
./script.sh - 测试完整流程:
./main.sh - 多次执行确认幂等性
- 查看日志确认无错误
部署阶段 ✅
- 确认
make install成功 - 运行
make status检查状态 - 重启系统验证自动执行
- 检查日志确认无错误
5.4 故障排查
脚本没有执行?
make status                              # 检查 hook 是否安装
ls -l init.sync/*.sh                     # 检查脚本执行权限
cat /tmp/user-startup-hooks/main.log     # 查看主日志
./main.sh                                # 手动执行测试
脚本执行失败?
cat /tmp/user-startup-hooks/init.sync/xxx.log  # 查看脚本日志
./init.sync/xxx.sh                             # 手动执行脚本
bash -x ./init.sync/xxx.sh                     # 使用调试模式
echo $?                                        # 检查退出码(非 0 表示失败)
网络相关任务失败?
ls -l init.sync/1.wait-network.sh              # 确保网络等待脚本在最前面
ping -c 3 8.8.8.8                              # 手动测试网络
cat /tmp/user-startup-hooks/init.sync/1.wait-network.log  # 查看网络等待日志
六、总结与资源
6.1 核心价值
使用 user-startup.d 框架,你可以:
- ✅ 5 分钟快速上手,无需学习复杂的 systemd 或 Docker
- ✅ 让系统配置在重启后自动恢复,告别重复劳动
- ✅ 使用统一的日志管理,快速定位和解决问题
- ✅ 通过模块化脚本,灵活管理启动任务
- ✅ 不阻塞系统启动,不影响服务可用性
6.2 下一步行动
# 1. 克隆并安装
git clone https://github.com/lazycatapps/user-startup.d.git /root/user-startup.d
cd /root/user-startup.d && make install

# 2. 创建第一个脚本
cp template.sh init.sync/6.my-first-task.sh
chmod +x init.sync/6.my-first-task.sh

# 3. 测试运行
./main.sh
6.3 相关资源
官方文档
项目链接
- GitHub 仓库:
https://github.com/lazycatapps/user-startup.d - 问题反馈:
https://github.com/lazycatapps/user-startup.d/issues
学习资源
6.4 贡献与反馈
欢迎以下贡献:
- 🐛 报告 Bug 和问题
- 💡 提出新功能建议
- 📝 改进文档和示例
- 🔧 提交脚本模板和最佳实践
🎉 结语
懒猫微服的"重启还原"特性曾经让你感到困扰,现在通过 user-startup.d 框架,它变成了一种优势:
- 系统始终处于干净的初始状态
- 配置通过脚本自动恢复,可重复、可追溯
- 不用担心系统"越用越乱"
只需 5 分钟,你就能搭建起自己的启动脚本管理系统。
现在就开始吧! 🚀
关于本文档
- 文档版本: v1.0
- 最后更新: 2026-01-11
- 反馈渠道: GitHub Issues
评论
0暂无评论